
Regardless of whether you’ve squatted with a barbell thousands of times, or haven’t done it a single time, this blog will give you some helpful tips for squatting with a barbell.
Squatting with a barbell may seem intimidating to learn if you have no experience, but it doesn’t have to be.
While there are things to take into consideration when learning the barbell variations—the height of the rack, walking the bar in and out, how to hold it—they’re still squats, so we can follow the same principles of squatting we use for any variation.
One thing that helps our members not feel intimidated, and learn the movement in general, is our use of strength standards (which you can read about here). By passing the squat strength standard, you have demonstrated skill and strength in the squat, which makes learning the barbell variations much, much easier. Once the strength standard for the squat is passed—and celebrated of course—you’re ready to move on to the barbell.
One thing to mention before we get rolling: I’ve talked about the basics of squatting before, which you can read here, so I won’t be covering those pointers in this blog. If you haven’t read that article, I would start there before continuing onto the rest of this blog.
Height of The Bar In The Rack for Squatting
Before we squat with a barbell, we must set the bar at the right height—this sets us up for success; this height will vary depending on the exercise—Zercher squats will be set lower than safety bar squats for example—but there are a few other things to keep in mind. Just like Goldilocks didn’t want her porridge to be too hot or too cold—the height of the bar shouldn’t be too high or too low.
If the bar is set too high, then we will have to tip toe the bar out, which is not safe. If the bar is set too low, then we will have to perform a half rep just to get started, which is less efficient. As shown in the video below, we want to set up where we can “quarter squat” the weight out of the rack.
Squat Walk-Out
Once we’ve stood up with that sucker (aka the heavy barbell), then we must move into position to squat. There’s no one size fits all answer here, but a good rule of thumb is to take 2-3 steps to get set; personally, I take 3 steps as you can see in the video below. We don’t want to take too many steps because that wastes our energy before we do what we are there to do, which is to squat. Plus, consistently walking out the same way sets us up so we can focus on the task at hand—to squat.
Squat Walk-In
Fast forward to the completion of your set of squats, and we must put the bar back in the rack. So, how the heck do we do that?! Well, pretty much the same way we walked it out actually. A common mistake I see though, is when someone tries to set the bar down in the rack. Say whatttt? Stick with me for a second—well, multiple seconds actually, unless you read fast.
Instead of trying to set the bar down on the rack, we stand tall, walk it forward, and we stay tall until we make contact with the rack. If we try to set the bar down before we make contact there’s a chance we may miss the rack—which is bad. When we walk the bar all the way in, while staying tall, then we know the bar is back safely over the J-hooks (the part of the rack the bar is placed on), because we hear and feel it hit both sides; then, we set the bar down in the rack. This is shown in the video below.
So, now that we’ve discussed setting the height of the bar for squats, and walking them in and out, let’s discuss the four main squat variations we use.
Zercher Squat
The Zercher Squat, along with the Safety Bar Squat, is usually one of the first variations we move people onto once they pass the Squat strength standard. It’s an easy movement to learn—you simply set the bar in the crease of your elbows, bend your elbows, and you’re good to go.
Now, you may be wondering, “I’m not sure what to do with my hands?”. If you are, then there are two options: you can make fists and leave them parallel with each other, or you can grab each fist to keep them held tight; both work and are good options.
One last technique point to mention though, before we move on, is that we don’t want to try to do anything with the bar; what I mean is the bar should simply “hang.” If we try to pull up or down on the bar it will mess up the position.
Safety Bar Squat
The safety squat bar is a great piece of equipment that allows you to load the squat heavy, but doesn’t require a ton of time to learn—it requires minimal mobility too, when compared to a back or front squat.
To get set up, step under the bar, set the bar on your traps—NOT on your neck–with the handles parallel with the floor (the handles should be pointing forward in other words). If you would like, you can let go of the handles to see if the bar balances naturally—if it doesn’t, then the bar position should be adjusted. Once set up, perform the normal squat walk out and you’re ready to squat.
Front Squat
When front squatting—this may surprise some of you reading—the bar is held on the front of the body. I know, crazy, right? While that may seem obvious, what is not obvious is how this effects the squat itself.
Without getting too far into the weeds with fancy talk: front squats require an upright torso, sufficient ankle mobility, is more “quad dominant” than some squat variations, and depending on the grip—whether a clean grip or cross arm grip—requires sufficient mobility to hold effectively (a clean grip is shown in the video below). And although we program it less frequently than Zercher or Safety Bar Squats, it’s a valuable variation if the person can perform it successfully.
Also, one cool factoid about this squat is that it’s the “receiving position” of a clean—so in order to perform cleans well, then one needs to be able to front squat.
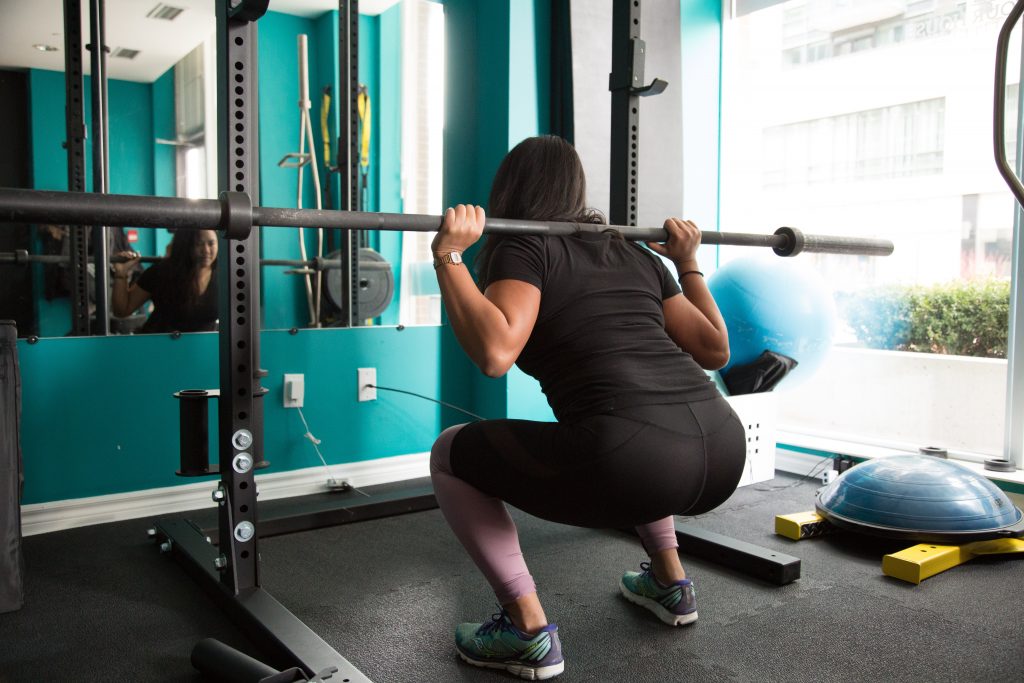
Back Squat
The back squat, while a great exercise in ways, is the variation we use least with our members. For many, getting into the proper position can be challenging—or impossible due to mobility demands of the shoulder and T-spine—which could stress areas we don’t want to stress. That being said, if you can achieve the position, then it’s a useful variation that can be loaded heavy; it’s also necessary to train them if one competes in powerlifting.
To perform: step under the bar with the bar resting on your traps, perform the normal squat walk out, then squat. Also, as shown in the video, we want the elbows to stay under the bar, or close to it, throughout the lift because it helps us keep tension. If the elbows shoot up, then we could potentially round our upper back, and it causes us to lose the tension we need under heavy weight.
Summary
So there you have it, some tips and tricks for better barbell squatting; you find the right height in the rack for the variation you are performing, walk it out, use the tips above for the squat variation you are performing, then walk it back in. Remember though: there is no one size fits all to squatting. What matters is finding the best squat variation for YOU, that puts YOU in the best position to be successful.