Do you struggle to do a push-up from the floor?
You get set at the top, mentally prepare yourself to do the movement, go down to the bottom position, then…nothing. You can’t get back up. Defeated by the push-up again.
If you’ve felt this way, you’re not alone. In fact, performing a push-up from the floor is something that many of our members express wanting to do when they join BSP NOVA.
While getting your first one from the floor can feel challenging, it doesn’t have to be impossible. Because it is doable. You just need to know what to do to get there—the path that will lead you there in other words.
Before I show you the path to achieving a push-up from the floor—that is, a four month long program included at the end of this blog—let’s discuss three things first:
- The prerequisite needed to do a push-up
- Why Modified Push-Ups are better than Knee Push-Ups
- Specificity of push-up training
A word of caution: you may want to skip right to the program. And you could do that. Totally could. But the following sections before the program will help set you up for success, so I wouldn’t recommend skipping them.
1. The Prerequisite Needed For A Push-Up
Here’s a misconception about the push-up: it’s not just an upper body exercise.
It is also a core strength exercise. Think about it this way. We call the top of the push-up a push-up position plank, because when we perform a push-up properly, it will look like a moving plank (first video below is of a push-up position plank, while the second is of a push-up).
Since it is a moving plank, we need to be able to hold a solid plank position before we can do a push-up. Trying to do a push-up from the floor before being able to hold a plank is like trying to drive a car before taking it out of park; you won’t get very far.
Being able to plank comes first.
So where do you start? Try holding a push-up position plank for about 20-30 seconds. This will be done in a tall and tight position—where your lower back is flat, not arched or rounded, and your body is in a straight line from heel to head. If you can maintain this for 20-30 seconds comfortably it’s a great sign.
And what do you do if you can’t maintain good position plank for long? There’s a few options:
- Start with the amount of time you can comfortably hold—maybe 5 seconds, maybe 10—and do a few sets of that to build strength; or
- do a modified plank by placing your hands on a chair, bed, etc., to elevate your body and make it easier (shown in video below).
Does this mean that, if we can hold a push-up position plank for 20-30 seconds, we’re ready to do a push-up from the floor? Not necessarily. But it’s an important prerequisite.
2. Knee Push-Ups Vs. Modified Push-Ups
Here’s a common mistake that’s made with training when we can’t perform a push-up from the floor: we do a knee push-up instead.
That’s not ideal.
Though it helps us build some upper body strength, it’s missing an important component we just talked about: core strength. By dropping the knees down we make it much easier on the core. In other words, it neglects training something essential to doing a floor push-up.
This is where the modified push-up comes in.
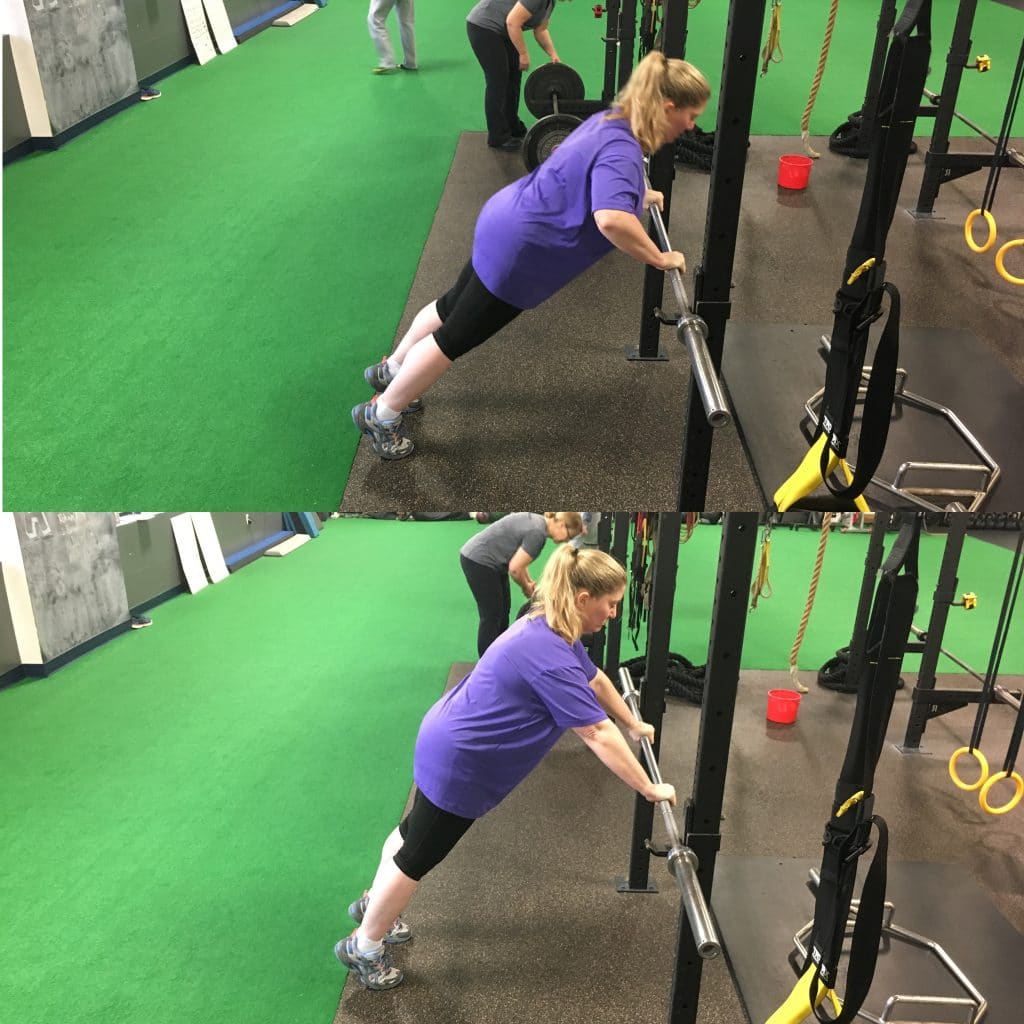
To perform a modified push-up we elevate our hands up off the floor; this could be done using a bed, table, your dog (don’t do that), or any other stable object. By elevating our hands off the ground—and thus inclining our body—we make the movement easier to perform. Now, we get the upper body strength benefit as well as the core strength benefit.
3. Specificity
Let’s do a mini recap: a push-up is a moving plank, which is why Modified Push-Ups are a better exercise when compared to Knee Push-Ups.
Before we get into the nitty-gritty of the program though, we must discuss something specific: specificity. Specificity is a principle of training. Basically, it says the training we do should be specific to the result we want.
So, in order to get better at doing push-ups we must—drum roll please—do push-ups.
You’re probably rolling your eyes. Or saying, “Well duh, Tommy, of course I need to do push-ups in order to get better at doing push-ups.”
But I state the obvious for a reason. I’ve seen many people, an unfortunate number of people, not make progress with push-ups because they didn’t do them enough. Sure, they did chest and shoulder and triceps exercises. But not push-ups specifically.
They’d be frustrated because they would do dumbbell chest presses, or cable flies—yet only one day, if that, of push-ups—and wonder why they didn’t make progress. Those exercises work similar muscles groups, sure, but they aren’t as specific as doing the real thing.
That’s why the program below has a lot of push-ups in it. Doing them frequently allows you to gain skill in the movement, as well as have enough volume to make progress with them.
If you truly want to do a push-up from the floor, then the program below will help you get there, so long as you trust in the process of doing lots of push-ups.
The Push-Up Program
Let’s discuss a few things about the program that will ensure your success.
First is how to read it:
- There are three workouts a week, with each workout using a different variation of the push-up.
- The first set of numbers in each box is the number of sets, and the second set of numbers is the number of reps. For example, “2-3 x 8-10” is “2 to 3 sets of 8 to 10 reps.”
- You’ll want to rest one to two minutes between each set to ensure you are recovered enough to produce quality reps.
- For the “Modified Push-Up w/ Pause,” the pause will be around 1-3 seconds.
- For the “Modified Push-Up w/ Slow Eccentric,” the lowering portion will be around 2-3 seconds.
Second, since these are “modified”, you will need to find somewhere to do these that makes sense for you. Ideally, this would be in a gym using a barbell in a rack or a smith machine. This way, you can lower the bar incrementally as you gain strength. But if that’s not doable, then you can do these at home too.
You can use a table, bed, chair, set of stairs, etc. As long as it’s stable and can support you, then it’s fair game. As a rule of thumb: the higher the object, the easier it will be. So start on a higher object to ensure good form, and if/when able, lower the height to make them challenging.
Third, leave a few reps in the tank each workout; meaning, you should stop the set if you feel you can only do two or three more reps.
It might feel easy and that’s okay. You should feel like you are working, but not that you are dying each workout. If you feel like you’re about to vomit, then do the lower number of reps, or find a higher object if possible to make them easier.
Lastly—but most importantly—a quick thought to keep in mind as you get going on this program, since there will be times when you doubt if it is working:
“When nothing seems to help, I go and look at a stonecutter hammering away at his rock, perhaps a hundred times without as much as a crack showing in it. Yet at the hundred and first blow it will split in two, and I know it was not that last blow that did it, but all that had gone before.” -Jacob A. Riis
Some days you will feel like quitting the program—maybe it’s hard, maybe you’re bored—but either way, keep pounding the stone. Some days it will feel like you haven’t made progress. Pound the stone anyways. Some days you’ll want to skip the push-ups. That’s okay. Pound the stone anyways.
If you keep pounding the stone, then it will eventually crack; in more “push-upey” words, if you keep getting your reps in, then eventually you’ll crush a push-up from the floor.
Month One:
| Workout A | Week 1 | Week 2 | Week 3 | Week 4 |
| Modified Push-Up | 2-3 x 8-10 | 2-3 x 8-10 | 3-4 x 8-10 | 3-4 x 8-10 |
| Workout B | Week 1 | Week 2 | Week 3 | Week 4 |
| Modified Push-Up w/ Pause | 2-3 x 5-6 | 2-3 x 5-6 | 3-4 x 5-6 | 3-4 x 5-6 |
| Workout C | Week 1 | Week 2 | Week 3 | Week 4 |
| Modified Push-Up w/ Slow Eccentric | 2-3 x 5-6 | 2-3 x 5-6 | 3-4 x 5-6 | 3-4 x 5-6 |
Month Two:
| Workout A | Week 1 | Week 2 | Week 3 | Week 4 |
| Modified Push-Up | 2-3 x 5-6 | 2-3 x 5-6 | 3-4 x 5-6 | 3-4 x 5-6 |
| Workout B | Week 1 | Week 2 | Week 3 | Week 4 |
| Modified Push-Up w/ Pause | 2-3 x 3-4 | 2-3 x 3-4 | 3-4 x 3-4 | 3-4 x 3-4 |
| Workout C | Week 1 | Week 2 | Week 3 | Week 4 |
| Modified Push-Up w/ Slow Eccentric | 2-3 x 3-4 | 2-3 x 3-4 | 3-4 x 3-4 | 3-4 x 3-4 |
Month Three:
| Workout A | Week 1 | Week 2 | Week 3 | Week 4 |
| Modified Push-Up | 2-3 x 6-8 | 2-3 x 6-8 | 3-4 x 6-8 | 3-4 x 6-8 |
| Workout B | Week 1 | Week 2 | Week 3 | Week 4 |
| Modified Push-Up w/ Pause | 2-3 x 4-5 | 2-3 x 4-5 | 3-4 x 4-5 | 3-4 x 4-5 |
| Workout C | Week 1 | Week 2 | Week 3 | Week 4 |
| Modified Push-Up w/ Slow Eccentric | 2-3 x 4-5 | 2-3 x 4-5 | 3-4 x 4-5 | 3-4 x 4-5 |
Month Four:
| Workout A | Week 1 | Week 2 | Week 3 | Week 4 |
| Modified Push-Up | 2-3 x 3-4 | 2-3 x 3-4 | 3-4 x 3-4 | 3-4 x 3-4 |
| Workout B | Week 1 | Week 2 | Week 3 | Week 4 |
| Modified Push-Up w/ Pause | 2-3 x 2-3 | 2-3 x 2-3 | 3-4 x 2-3 | 3-4 x 2-3 |
| Workout C | Week 1 | Week 2 | Week 3 | Week 4 |
| Modified Push-Up w/ Slow Eccentric | 2-3 x 2-3 | 2-3 x 2-3 | 3-4 x 2-3 | 3-4 x 2-3 |
One last note about the program: if you’re using an object that’s less than a foot from the floor in height, and you’re considering trying a push-up from the floor, then go for it. If you can do one…great! If not, then go back to training the modified push-up and try again at a later time. Keep pounding the stone.
By the way, if you’d like more help with your push-ups, such as some coaching in person, then fill out the form below to claim your free week. We’d be happy to help you reach your push-up goals.